Monday, April 29, 2013

Farmacology, by Dr Daphne Miller

Good health is built from the ground up. Literally, according to a new book titled Farmacology by Dr. Daphne Miller. Her book provides an insightful view on sustainable health and healing which I thoroughly enjoyed. It is a well-written narrative of the health of our food systems as related to the well-being of our body- each regarded as complex, dynamic organisms requiring holistic maintenance and treatment.

After visiting seven family farms across the US, each chapter draws links between common ailments such as asthma, stress, and cancer, and the types of food we put in our body as means of treatment (and how 'non-foods' are often a root of these problems).

As a writer, I appreciated Dr. Miller's intelligent, yet user-friendly writing style. Her humor, sentiment, and personal anecdotes from "down on the farm" interjected with discussions of scientific medical research makes this a fascinating read for anyone interested in whole food, agriculture, and healthy living.

Dr Miller's holistic approach to wellness seems like total common sense. Eat seasonal. Eat local. Eat food that comes from farms where the earth, plants, and animals are treated with respect and care. Every time I navigate through our neighborhood's monstrous grocery store, I wonder how many people actually eat 'real food'. I even wonder where most of the produce comes from. Despite having beautiful and sometimes exotic vegetables piled high for row upon row, most of it isn't farmed locally- let alone in-state. "Garbage in. Garbage out." We really do become what we eat. I can't recommend this book enough for Dr. Miller's valiant effort to bridge medical and ecological sciences into a thoughtful take on the relationship our bodies have to the earth.

The timing of this book couldn't have come at a better time as I launch Seasoned Travels, a Columbus-based culinary tourism company dedicated to preserving, exploring, and building culinary traditions and cultural heritage. I have been in touch with Dr. Miller (Twitter) who is a physician and Professor of Medicine at the University of California, San Fran. She graciously agreed to let me pick her brilliant brain as many of our Seasoned Travels tours nod heavily toward agritourism and meeting food producers. We are planning some interesting farm-to-fork itineraries to Northern California with hopes of having Dr. Miller speak to our group. Fingers crossed. Stay tuned for this and until then, get yourself a copy of Farmacology, plant a garden, and get to know your local food producers! You are what you eat.


Wednesday, March 6, 2013

Fazzoletti "Handkerchief" Pasta


Fazzoletti, which in Italian loosely translates to "handkerchief," is a type of super thin pasta rolled with herbs and popular throughout the Mediterranean- each country having their own herbal profile and serving style. This is a beautiful, artistic, and creative type of pasta, which allows for endless combinations of herbs and flavor profiles. The following is my original recipe.
2 cups of King Arthur's Wheat Flour, three Pete and Gerry's Heirloom Eggs, two tables spoons of olive oil and blend by hand until firm dough develops. Add a few drops of water if it is still a bit dry. It should be somewhat stiff dough.


Roll dough into ball and wrap with cling wrap. Refrigerate for a few hours.


Clean & prepare your herbs. This required about 2 cups. I used: parsley, watercress, and dill.You can get as creative as you want with the combination of greens. Don't be afraid to mix in lettuce varieties.


Split the large dough ball into four smaller discs. Using pasta roller, roll until it's very thin. I turned the knob all the way to 6 to allow it to be nearly translucent. Cut the super long sheet in equal halves.


The fun part! Decorate one half of the sheet with herbs. You can add garlic powder , dried herbs, salt & pepper at this point. The skies the limit with creativity.


Lay the other half of the pasta sheet on top, in essence making a giant pasta sandwich . Press them together gently as not to mess up your herb art. Use a rolling pin to get the two sheets to stick together to pass through roller again.


I rolled the sheets through setting 4 and five again. It should stretch and distort the herbs into beautiful patterns, reminiscent of a handkercheif.


I think they look like fern fossils, so I nicknamed it "Fossil pasta." Cut the pasta sheets however you prefer. I sliced them into square-ish bits to keep the integrity of the "image"


Bring a large pot of heavily salted water to a slow boil and drop in the pasta peice by peice. Let cook 5-6 minutes and fish them out with a pasta fork or slotted spoon. They stayed in tack quite nicely.


They looked almost too pretty to eat... ALMOST! I served them with a simple drizzle of garlic and shallot sautteed in olive oil and white wine; then topped with grated Parmesan. Fazzoletti has a distinctly herbal flavor, but not too overpowering. This pasta is a total 'looker' and makes a beautiful side dish or can stand on its own-- as in this case. Just served with a crunchy side salad and asparagus.


Sunday, February 10, 2013

Pasta for beginners: Whole Wheat Pasta with Spinach, Garlic & Mushroom Sauce


Making pasta is much less intimidating that one might think. It's fun and the process quite therapeutic, whether you do it alone or with another person. Just be sure to begin with a very clean and dry surface on which to make and roll the dough. Clean hands too...

This particular pasta only requires four ingredients, so make sure they are the best you can afford.

As for the pasta roller, I use a standard (albeit ancient) Atlas maker that runs around $65- $85 and comes with the attachments to make various sized spaghetti, linguine and flat ravioli or lasagna noodles. The Imperial brand pasta roller is likewise very good quality.

You can be as creative as you'd like with pasta toppings. I don't recommend red sauce or pesto with the nuttier flavor of the wheat pasta. I usually stick with am olive oil and garlic based  sauce to allow the hearty noodle's flavors to stand on their own. Flavor comes with the additional ingredients. My standard includes: chopped chicken sauteed in garlic, along with mushrooms, spinach, and topped with Parmesan and Parsley.

EQUIPMENT
Pasta roller with linguine attachment
2 cookie sheets lined with wax paper
Rolling Pin
Large pot for boiling water
Skillet for cooking down additional ingredients

INGREDIENTS  (yields 2 large servings or 3-4 smaller side servings)
2 cups of premium whole wheat flour - I use King Arthur's brand for it's consistency & quality
4 eggs - I use Pete & Gerry's Heirloom eggs for their beautiful yolks and incredible flavor
2 tablespoons olive oil
3-finger pinch of salt - use kosher salt, not sea salt.

1 box frozen spinach
2 cloves garlic
6-8 medium button or cremini mushrooms
2 ounces of crushed walnuts
Grated Parmesan cheese and chopped parsley for topping

2 Cups Whole Wheat Flour, 4 eggs, 2 tbs oil, pinch of salt 

Atlas pasta roller with linguine attachment

Slide the attachment into the grooves

Line baking sheets or a counter with wax paper for pasta to dry 

Create mound of 2 cups of flour with a well hollowed out in center.
Pour in ONE tablespoon of olive oil

Crack two eggs into the well

Begin to blend by hand. It will be floury & crumbly

Note super dry, crumbly texture

Add additional two eggs and mix until it all sticks together.

It will still be somewhat tough dough. Add additional tablespoon of olive oil (or even a teaspoon of water) to make it hold together in a proper, not too sticky, dough ball 

Roll into a ball (or hen-shaped blob). Add in any herbs, pepper, or garlic powder then knead through;
I only added ground black pepper

Divide into four even dough balls. About the size of tennis balls.

Using a rolling pin, flatten the balls into long rectangular sheets 1/2 inch thick 

Using toggle and hook, secure roller to the edge of a counter
& attach handle

Set pasta roller knob at the lowest setting (number 1 in this case).
The spring loaded knob just pulls out and turns.

Feed each flat pasta panel through the main side of the roller, by pressing the edge of the dough into the space and cranking the handle. (Note: the higher the knob's number, the tighter the space between rollers). 

After each feed, turn the knob one more notch (to #2), then re-feed the pasta, allowing it to get thinner and thinner. 

I went all the way up the  #5 setting on the knob. Ended up with pasta sheets around 18" long and 1/8 inch thick.
Don't roll it too thin or it will fall apart. You should be able to see  light through the sheet.

The long pasta sheets tend to fold in nicely on themselves.


Cut each sheet in half for more manageable rolling through the cutting attachment

Press the end of a sheet firmly into the pasta attachment teeth, just so that it catches and rolls easily. I used Linguine 


The pasta sheet should just catch and roll through easily, being sliced into strips 

Spread each batch out as much as possible, sprinkling with wheat flour and tossing it onto the wax paper lined sheets.  Make sure the noodles don't stick together. You can also hang dry them.

Let pasta air dry for an hour or so; flipping them around every so often.  They shouldn't be too hard or dry 

Treat yourself to a tasty beverage for  all your hard work.
When well-lubricated, prepare to make pasta toppings.

Prep additional ingredients. I cut everything up and cook it individually to be added to the pasta at the very end. Normally, I would add seasoned chicken to the mix, but skipped it here.

Cook down spinach for 10 mins, throw in the mushrooms, after another 5 minutes, add chopped garlic. 

Stir frequently so it doesn't stick or overcook the spinach

Have a VERY LARGE pot of water boiling, Heavily salted-- and I mean a good fist full of kosher salt. The pasta absorbs the salt, lending to the flavor.
KEY: Rolling water keeps the pasta separated and helps the starch disperse into the water-, so you don't end up with gummy noodles. Cook no more than 5 minutes!
Home made pasta cooks FAST!

Fork it out directly from the water into pasta bowls. Drizzle with olive oil, and stir in your additional ingredients; flipping it around till it's all mixed through. Top with Parmesan cheese and chopped parsley.
Whole wheat pasta is very hearty, filling, and good for you.

BON APPETIT! 

Thursday, January 24, 2013

Chocolate Hazelnut Crepe Cake


**Reposted from my culinary venture, Simply French**


From the time I was very young, crêpes were a staple breakfast food on the menu in our home. My favorite meal of the day was "breakfast for dinner". You know what I'm talking about...foregoing the oven roasted chicken or fresh pasta for a plate of fried eggs and toast with a greasy side of bacon or a simple bowl of cereal and milk. In our family we had crêpes with preserves and hand whipped cream for dinner often. I think my mother's crêpe recipe was embedded in her DNA, since she so effortlessly whisked up a batch of batter in no time at all. All we had to do was mention the word and soon we had a stack of perfect crêpes waiting to be rolled and stuffed into our faces. I'm thankful to have inherited this gene because I love making these delicate, lacy-edged treats for my family almost as much as I love eating them.

A few weeks ago a friend asked me to help her make a Crêpe cake. She received a new du Buyer blue steel pan for Christmas and had fallen madly in love with it, just as I did when I first got mine many years ago. Together we made a gorgeous cake layered with crêpes, toasted hazelnut pastry cream, and topped with a chocolate sauce and candied hazelnuts. It was so divine that I wanted needed to make it again! Stat!

Ok, fast forward to last night, I decided to tackle this cake knowing there were quite a few steps involved and I would likely be up very late finishing it. I had everything I needed but raw hazelnuts or filbert nuts as I've learned they're also called. Brian was sweet enough to stop at the market on his way home from work. He thought I needed 2.5 pounds of nuts, but luckily he called before checking out because I only needed 2.5 cups. Big difference, however, I could think of a million things to use those extra filberts for if he had purchased them. Oh, and I also needed a bottle of wine. For me. Not the cake. Like I said, good thing he called! :)

So, step one: Pour a glass of wine...


Once I was properly lubricated, I was ready to dive into whisking, mixing, melting, simmering and candying. I always try to use the best ingredients. I find it makes such a huge difference in the final product and I just don't like cutting corners when I bake. Once I discovered King Arthur Flour many moons ago, I haven't use any other brand.  I even recommend it to all of my students that take the Simply French cooking classes that I co-teach with my sister, Shawnie.  It's just a far superior flour than any other I've used before.  It's wonderful quality and always so consistent.  My point...use fine ingredients.  It really does matter.


The recipe (below) is rather long, so I'll give you a brief overview.  First you want to prepare your crepe batter.  It will need time to sit for a few hours or even over night if you have the time.  The key to amazing crepes is good quality flour and eggs.  A few months ago I was introduced to Pete & Gerry's Heirloom Eggs. They are so vibrant in flavor and color. Now I always have them in my fridge. Try them. You'll love them.


I love these Duralax Picardie prep bowls!  Christmas gift from my hubby.  Score!


Next you want to toast your hazelnuts and make the pastry cream. To toast, just place the nuts on a cookie sheet and bake at 350 for 10 mins.  Give them a shake halfway through for even toasting. I find that the easiest way to get the skin off the nuts after toasting is to take a handful and rub them together between your palms.  The skin flakes right off and fall onto the pan below.  Just like that!


Skinned and ready for the food processor.

The hazelnuts smell so amazing once they're chopped to oblivion in a food processor along with powdered sugar, a pinch of salt and a bit of hazelnut liqueur.

The pastry cream comes together quickly with your tempered egg yolks/cornstarch mixture, sugar, milk and processed hazelnuts.


I used an offset pastry spatula to spread the pastry cream between the layers of crepes.  Spread the cream across the cake evenly to keep a hump from forming in the middle of the cake.

It takes 1/4 cup of pastry cream between layers.  I used a measuring cup for consistency.

18 layers of hazelnut sweet goodness.

What?  There's one extra crepe?  Better not let it go to waste!

The chocolate icing is a cinch.  I've tried a few different methods and found that melting the chocolate first over a double boiler before pouring heavy cream over it yields a smoother texture without having to re-heat it later to melt any bits of chocolate that didn't fully melt before.


Once your icing is prepared, it's as easy as pouring it over the cake, topping it with candied hazelnuts and you're done!  This cake makes me so happy.  It's definitely a labor of love, but oh so worth it once you take your first bite. Don't be intimidated by its complexity. It's quite simple to make if you break it down into parts.  Take your time and enjoy the process.  Once the cake is finished and placed on the table, it will be gone before you can blink!


Chocolate Hazelnut Crepe Cake

Crepes (step 1)
6 Tablespoons unsalted butter - melted (I prefer to use clarified butter)
2 1/3 ups whole milk
6 large Pete & Gerry's Heirloom Eggs
1 1/2 cups King Arthur All-Purpose Flour
1/ teaspoons Kosher salt
1/2 cup granulated sugar
1/4 teaspoon pure vanilla extract

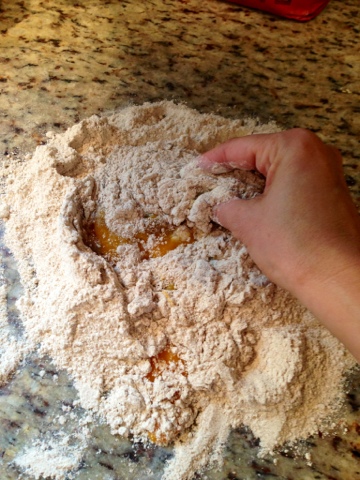
Melt butter.  In a large bowl whisk together eggs, milk, salt, flour, sugar and butter until smooth.  Cover and refrigerate for at least an hour or up to 2 days.  You can also use a blender to combine the ingredients.  To make crepes, pour 1/4 cups batter in a pre-heated crepe pan or skillet, which has been brushed with butter.   Swirl the batter until the pan is coated evenly.  Return to heat until the edges of the crepe become lacy and lift from the pan.  The bottom of the crepe will have browns slightly.  Gently flip and cook the other side for a few seconds.  Stack crepes and let cool until ready for assembly.

*I always have to throw the first crepe away (really, just eat it!) to prime the pan.

Hazelnut Pastry Cream (step 2)
1 1/3 cups toasted hazelnuts (skinned)
1 cup confectioners' sugar
2 1/2 teaspoons hazelnut liqueur (I used Frangelico)
1/4 teaspoon Kosher salt
3 1/4 cups whole milk
6 Tablespoons granulated sugar
5 egg yolks - Pete & Gerry's Heirloom Eggs
5 Tablespoons cornstarch
2 Tablespoons melted butter (I like to use clarified butter)

In a food processor, blend confectioners' sugar, liqueur, salt and hazelnuts until the consistency of a damp powder.  In a saucepan, heat milk, sugar and hazelnut powder to a simmer.  In a separate bowl combine egg yolks and cornstarch until smooth.  Temper the eggs using the heated milk mixture. Once the eggs are warm, whisk them into the pot with the milk mixture.  Bring the combined egg and milk mixture to a boil until it reaches the consistency of pudding.  Remove from heat and stir in melted butter.  Transfer to a bowl, cover the direct surface of the pastry creme with plastic wrap so a skin doesn't form, and refrigerate until completely chilled.

Candied Hazelnuts (step 3)
1/3 cup toasted hazelnuts skinned
1/2 cup granulated sugar
pinch of sea salt  (I use French grey salt)

Heat sugar and water until the sugar has melted and the liquid turns light brown. Add salt and hazelnuts.  Continue to cook until the color darkens slightly.  Remove from heat, remove nuts from pan and place on parchment paper to cool.   They will easily pull from the paper later.  Coarsely crush the nuts to sprinkle over the cake after the chocolate icing has been poured over.

Assembly (step 4)
Using a cake stand or cake plate, place one crepe in the center. Spoon 1/4 cup of the pastry creme onto the center of the crepe and spread evenly to almost the edges of the crepe.  Continue this pattern until you have used all of the crepes but one.  This last crepe will be the topmost layer before the chocolate icing is poured over.

Chocolate Icing (step 5)
5 ounces semi-sweet or dark chocolate chips
1/4 cup heavy cream
1 Tablespoon hazelnut liqueur

Place chocolate in a heatproof bowl. Using a double boiler, melt chocolate chips until they are completely soft.  In a small saucepan, heat heavy cream and liqueur until simmering.  Pour heavy cream over the chocolate and stir until smooth.  Let cool until it thickens slightly.  Pour over layered crepe cake slowly and spread to edges if needed.  Top cake with crushed candied hazelnuts

*If the chocolate isn't fully melted, return to the double boiler heat just long enough to allow the rest of the chocolate to melt.  Melting the chocolate before mixing with heavy cream helps eliminate this issue.


Be sure to check out the "Baking with Love" Pinterest contest sponsored by Pete & Gerry's Heirloom Eggs and King Arthur Flour. Create a Pinterest board using your favorite recipes inspired from King Arthur FlourPete & Gerry's Organic Eggs and Heirloom Meals by Carole Murko for a chance to win some great prizes. #bakingwithlove